(samples of submissions for 2006 Warm Glass Magnet Exchange)
Rorschach Tiles - How to ....
The following describes the process I use to make them. Virtually all of what I describe can be modified with generally predictable results.
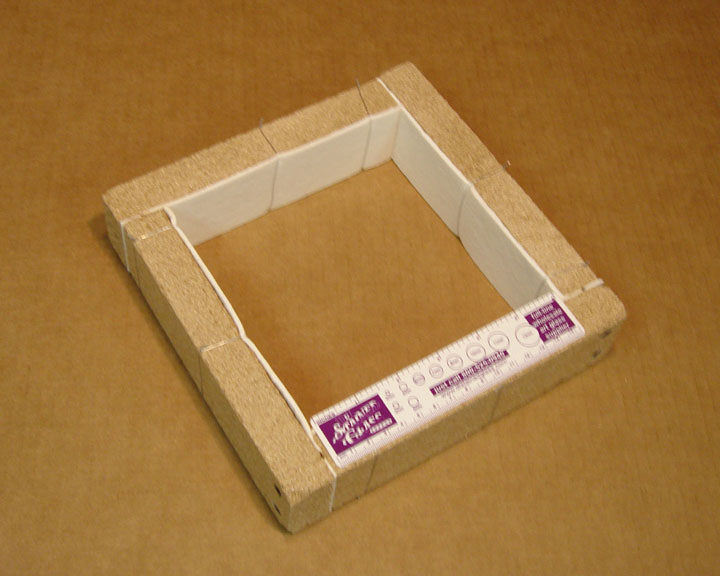 Start
by building a dam. I use 2” high
strips of ¾” vermiculite board (a refractory grade material which cuts/works
like wood) fastened together with 3” SS screws to create a dam with an
internal cavity of 6” X 6” X 2”.
I line the interior walls with 2” strips of 1/32” thin fiber paper
(NOT to be confused with Bullseye Thinfire paper, an otherwise outstanding
product not appropriate for this application) secured to the board with 25 gauge
high temperature (Ni-Chrome) wire; this insulation makes disassembly (and reuse)
of the dam walls easier.
Start
by building a dam. I use 2” high
strips of ¾” vermiculite board (a refractory grade material which cuts/works
like wood) fastened together with 3” SS screws to create a dam with an
internal cavity of 6” X 6” X 2”.
I line the interior walls with 2” strips of 1/32” thin fiber paper
(NOT to be confused with Bullseye Thinfire paper, an otherwise outstanding
product not appropriate for this application) secured to the board with 25 gauge
high temperature (Ni-Chrome) wire; this insulation makes disassembly (and reuse)
of the dam walls easier.
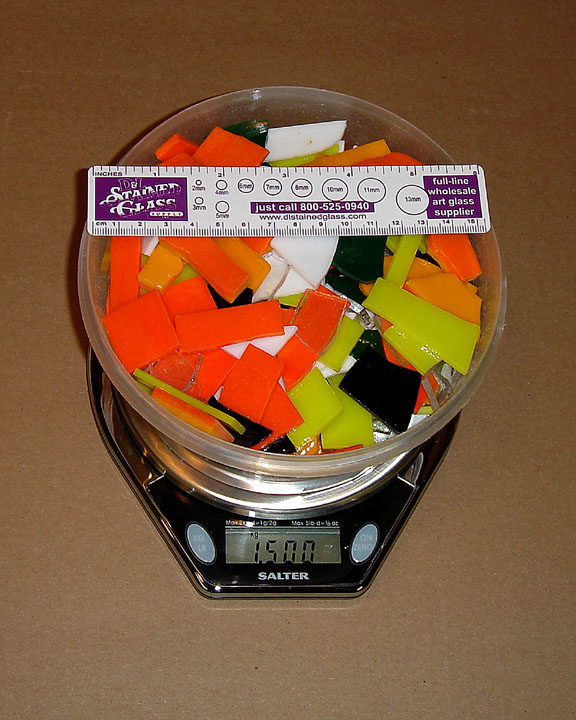 Place
the dam upon a kiln shelf which has been well-covered with several coats of
wash. Fill this dam with pieces of
glass of your choice. I use pieces
with a surface area of approx 1” square with little concern for the shape;
different sizes will prompt different patterns.
This is a wonderful opportunity to use scrap/broken pieces &/or
previously fused but unused or discarded elements (“Don’t refuse to
re-fuse!”). A 36”sq. dam
(above) will hold approx. 1500 gms. of glass (because of the substantial
variability of weight/area of art glass, a very
approximate equivalent is two ft.sq.). While this charge is intended to reach
the brim of the dam, the height of this glass will, upon melting, fall by about
half to approx. 1”, to occupy all the free (air) space originally occupied by
the glass shards.
Place
the dam upon a kiln shelf which has been well-covered with several coats of
wash. Fill this dam with pieces of
glass of your choice. I use pieces
with a surface area of approx 1” square with little concern for the shape;
different sizes will prompt different patterns.
This is a wonderful opportunity to use scrap/broken pieces &/or
previously fused but unused or discarded elements (“Don’t refuse to
re-fuse!”). A 36”sq. dam
(above) will hold approx. 1500 gms. of glass (because of the substantial
variability of weight/area of art glass, a very
approximate equivalent is two ft.sq.). While this charge is intended to reach
the brim of the dam, the height of this glass will, upon melting, fall by about
half to approx. 1”, to occupy all the free (air) space originally occupied by
the glass shards.
(About colors: as with a pot melt, you should use dark ones (particularly black) very sparingly as they tend to overwhelm the others disproportionate to their volume. And, while this process works not-at-all with cathedral glass (Yuck!), blending nuggets of clear with the opals can create some particularly interesting windows which draw attention to the tile’s depth, similar to cat’s eye marbles.)
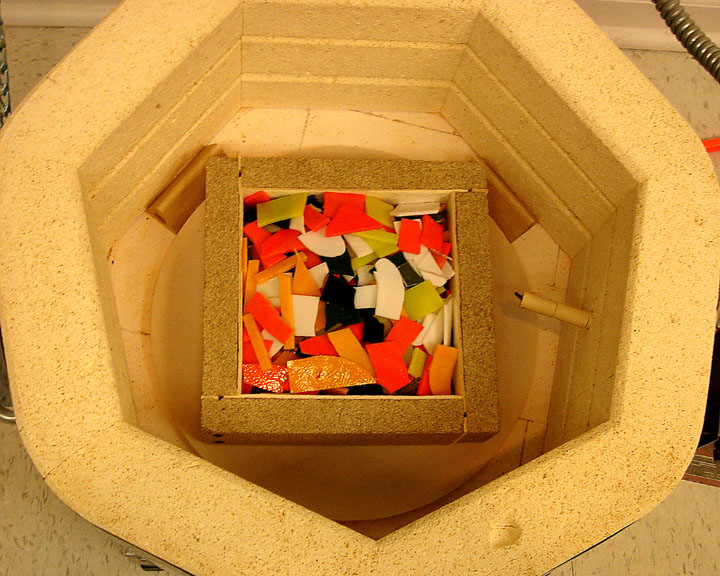 Prior
to the manipulation, the kiln shelf should be steadied within the kiln, either
by placing it directly on the kiln floor &/or buttressing the shelf against
the kiln walls. During manipulation,
drawing the tools through the inch-thick molasses-like consistency of the molten
charge may cause the shelf to become unsteady or shift were it simply sitting on
short posts (the dam containing the charge needs no such bracing).
Additionally, during manipulation, your tools should approach the bottom
of the glass charge, but you should be mindful not to scratch the kiln shelf and
draw any of the dislodged material (wash) or fiber wall liners into the glass.
Prior
to the manipulation, the kiln shelf should be steadied within the kiln, either
by placing it directly on the kiln floor &/or buttressing the shelf against
the kiln walls. During manipulation,
drawing the tools through the inch-thick molasses-like consistency of the molten
charge may cause the shelf to become unsteady or shift were it simply sitting on
short posts (the dam containing the charge needs no such bracing).
Additionally, during manipulation, your tools should approach the bottom
of the glass charge, but you should be mindful not to scratch the kiln shelf and
draw any of the dislodged material (wash) or fiber wall liners into the glass.
Crash cool to
the annealing stage, which should be extended to reflect the substantial
thickness of the glass block. The
System 96-recommended schedule is as follows:
|
(rate/target temperature/hold time) | |
|
9999/1700/one hour (quick ramp; long hold – time to manipulate) | |
|
9999/1000/15 (allow some time here to
stabilize) | |
|
500/950/two hours (a “lengthy”
anneal, with a gentle decline through the annealing range) | |
|
30/800/13 | |
|
50/700/10 | |
|
250/100/off |
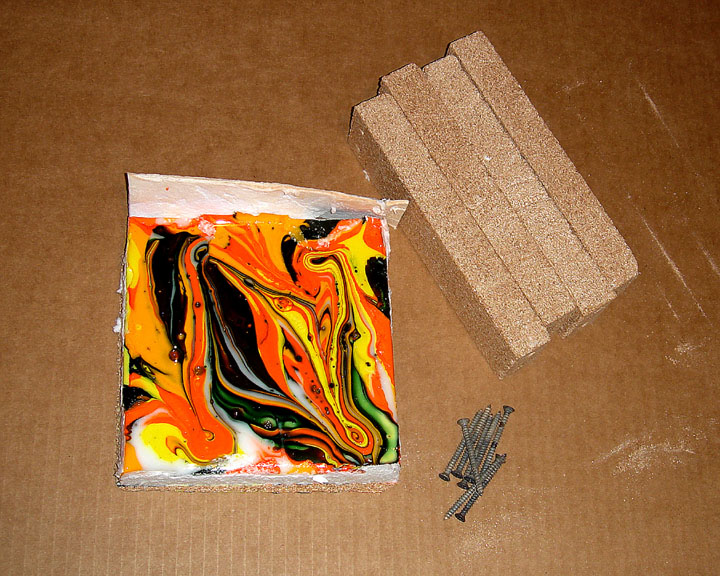 Constructed
in this fashion, an uncut glass block is like Forrest Gump’s box of
chocolates; until you “bite” into one, you never know what you’re going to
get! The discovery (tasting) is a
large part of the fun. The
photo(R) illustrates the cooled block, which has been
Constructed
in this fashion, an uncut glass block is like Forrest Gump’s box of
chocolates; until you “bite” into one, you never know what you’re going to
get! The discovery (tasting) is a
large part of the fun. The
photo(R) illustrates the cooled block, which has been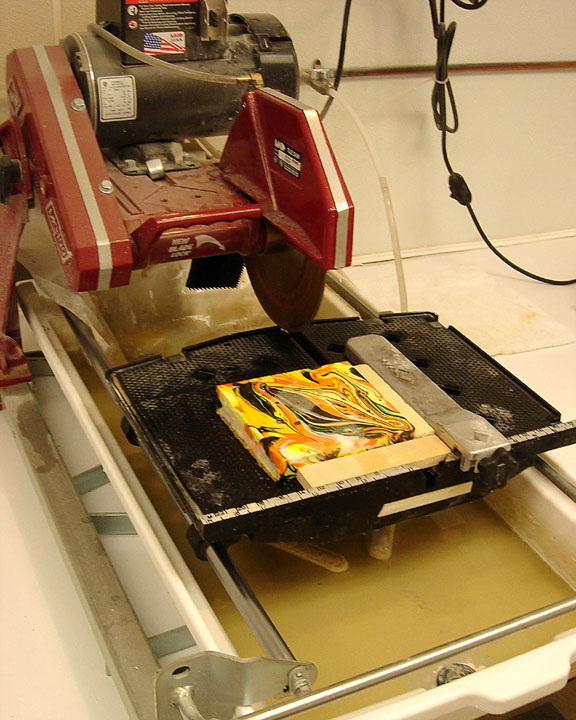 top-lapped and trimmed on three sides.
I use a MK-100 tile saw with a 10”, .032 width Result multipurpose
diamond blade supported by 6” aluminum wheel stiffeners.
The cooled block is cut into ¼ inch-wide slices to reveal the interior
“pattern”. The pictured
block yielded 22 slices; because I usually set aside the
top-lapped and trimmed on three sides.
I use a MK-100 tile saw with a 10”, .032 width Result multipurpose
diamond blade supported by 6” aluminum wheel stiffeners.
The cooled block is cut into ¼ inch-wide slices to reveal the interior
“pattern”. The pictured
block yielded 22 slices; because I usually set aside the 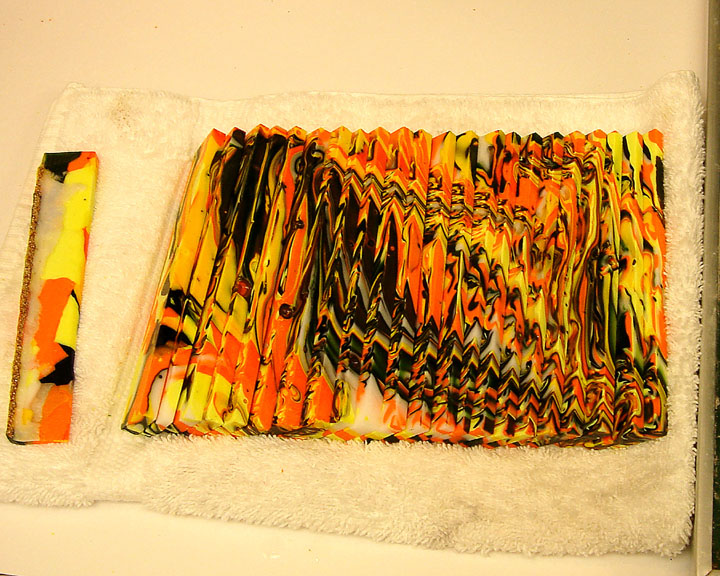 less-figured
outer ends (for a pot melt or other reuse), I was able to create 10 paired sets.
NB
It is critically important to the Rorschach process that, going forward, the
sequence and orientation of the cut slices be maintained, or else the symmetry
that the process depends upon is compromised/destroyed.
less-figured
outer ends (for a pot melt or other reuse), I was able to create 10 paired sets.
NB
It is critically important to the Rorschach process that, going forward, the
sequence and orientation of the cut slices be maintained, or else the symmetry
that the process depends upon is compromised/destroyed.
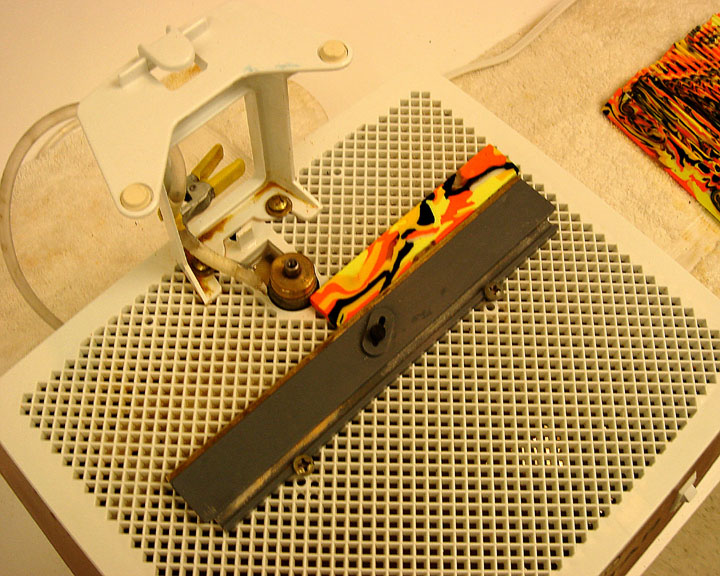 These
slices can then be lightly trimmed by a flat lap machine or a surface grinder,
to assure that the pairs, when joined, fit together cleanly/snuggly.
Because the top surface is where the pairs are joined, it is the top
surface (only) which benefits from being lapped or ground; the bottom tends to
be very flat in any event. The
grinder set-up shown in the photo, which includes an adjustable gate/fence
screwed into the grinder’s surface, is an extraordinarily useful arrangement
for grinding straight lines, parallel lines and/or other consistent, regular
shapes (squares). Note also the tube
through which flows fresh water directly onto the face of the grinding head (not
shown is a similar tube attached to the grinder base for the continual discharge
of waste water).
These
slices can then be lightly trimmed by a flat lap machine or a surface grinder,
to assure that the pairs, when joined, fit together cleanly/snuggly.
Because the top surface is where the pairs are joined, it is the top
surface (only) which benefits from being lapped or ground; the bottom tends to
be very flat in any event. The
grinder set-up shown in the photo, which includes an adjustable gate/fence
screwed into the grinder’s surface, is an extraordinarily useful arrangement
for grinding straight lines, parallel lines and/or other consistent, regular
shapes (squares). Note also the tube
through which flows fresh water directly onto the face of the grinding head (not
shown is a similar tube attached to the grinder base for the continual discharge
of waste water).
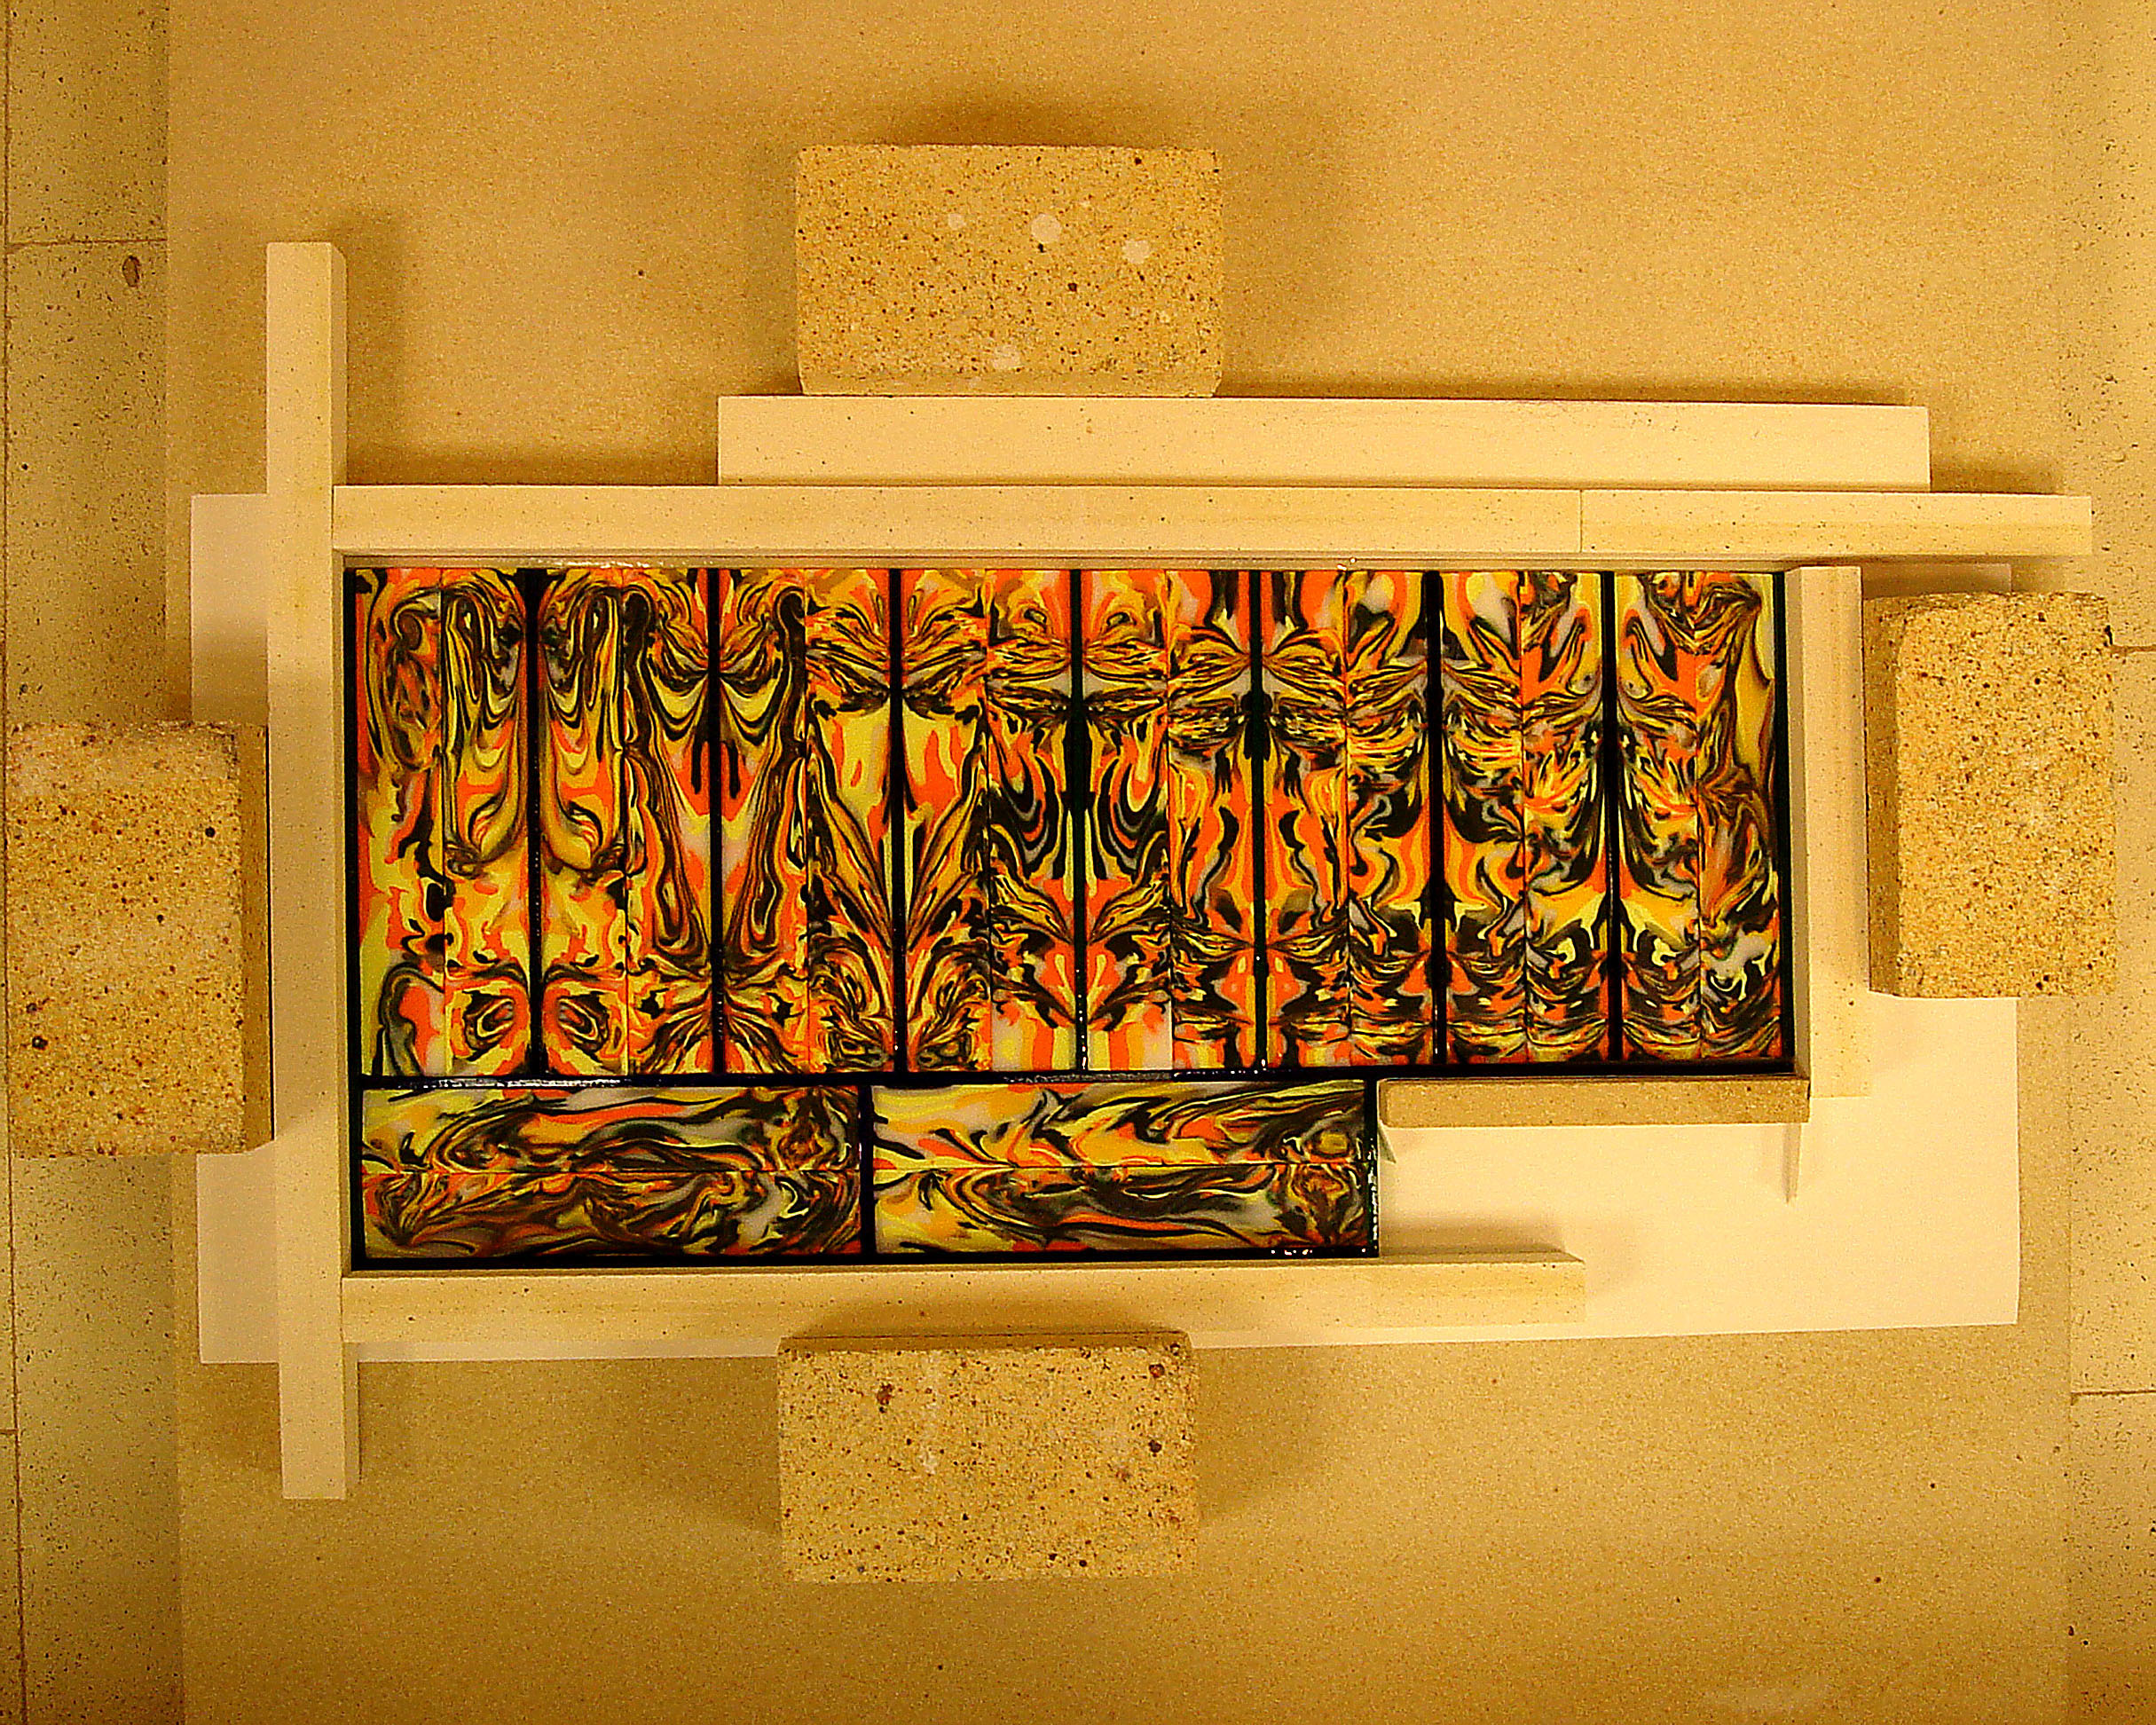 Paired
sets are created by “book ending” slices.
This is done by taking adjacent pairs and abutting their top surface (lay
the right slice down on its left side, and the left slice down on its right
side). Because combing of the molten
charge is conducted from the top surface (no kidding?), it is the top of the
block which tends to be more “figured” than the bottom and the sense of
symmetry is enhanced by this orientation. While
you may be initially disappointed with the seeming lack of symmetry the process
shows when you view these paired sets from the top, you will find the symmetry
is substantially greater when you observe their underside (go ahead … peek!).
After all, it is the underside faces which were closest together before
being sliced apart. I
separate/surround these pairs with glass strips and mullite dams before I return
them to the kiln for a second, more “ordinary” firing cycle:
Paired
sets are created by “book ending” slices.
This is done by taking adjacent pairs and abutting their top surface (lay
the right slice down on its left side, and the left slice down on its right
side). Because combing of the molten
charge is conducted from the top surface (no kidding?), it is the top of the
block which tends to be more “figured” than the bottom and the sense of
symmetry is enhanced by this orientation. While
you may be initially disappointed with the seeming lack of symmetry the process
shows when you view these paired sets from the top, you will find the symmetry
is substantially greater when you observe their underside (go ahead … peek!).
After all, it is the underside faces which were closest together before
being sliced apart. I
separate/surround these pairs with glass strips and mullite dams before I return
them to the kiln for a second, more “ordinary” firing cycle:
|
400/1000/0 | |
|
9999/1465/10 | |
|
9999/1000/8 | |
|
300/960/20 | |
|
200/800/0 | |
|
400/120/off |
 When
you remove the piece from the kiln and clean away the kiln wash or paper, you
will find a dramatic (positive) difference between the bottom side pattern and
the top side. While the top
side currently sports a shinier, fired finish, these pieces are intended to be
reversed and will almost certainly be further incorporated into a larger
plate/bowl/dish arrangement and refired (during which process, the rough/shiny
texture distinction will also be reversed).
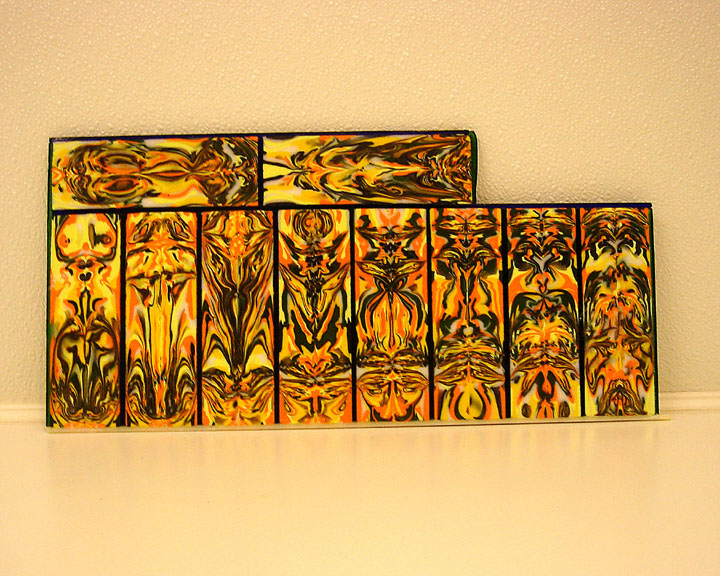
At this point, (after you saw to separate the several (10) matched pairs)
the Rorschach process is largely complete. Depending
on your trimming, slicing and grinding, the above project could yield as many as
30 (10 bars X 3 ea.) 1.75”sq. tiles.
Your yield may fall, however, if you elect to irregularly trim the bars
to capture some particularly fascinating figure, &/or you may elect to
discard some whole bars altogether. Now
is the time to closely examine these slices in order to capture what you think
are the most interesting images which you’d like your audience to “see”.
While some will doubtless be more interesting and pleasing than others, I
feel certain that you will consider many/most to be simply and literally
“fantastic”.
When
you remove the piece from the kiln and clean away the kiln wash or paper, you
will find a dramatic (positive) difference between the bottom side pattern and
the top side. While the top
side currently sports a shinier, fired finish, these pieces are intended to be
reversed and will almost certainly be further incorporated into a larger
plate/bowl/dish arrangement and refired (during which process, the rough/shiny
texture distinction will also be reversed).
At this point, (after you saw to separate the several (10) matched pairs)
the Rorschach process is largely complete. Depending
on your trimming, slicing and grinding, the above project could yield as many as
30 (10 bars X 3 ea.) 1.75”sq. tiles.
Your yield may fall, however, if you elect to irregularly trim the bars
to capture some particularly fascinating figure, &/or you may elect to
discard some whole bars altogether. Now
is the time to closely examine these slices in order to capture what you think
are the most interesting images which you’d like your audience to “see”.
While some will doubtless be more interesting and pleasing than others, I
feel certain that you will consider many/most to be simply and literally
“fantastic”.
Hmm … now, what to do with all this
“scrap”?!
(samples of submissions for 2006 Warm Glass Magnet Exchange)